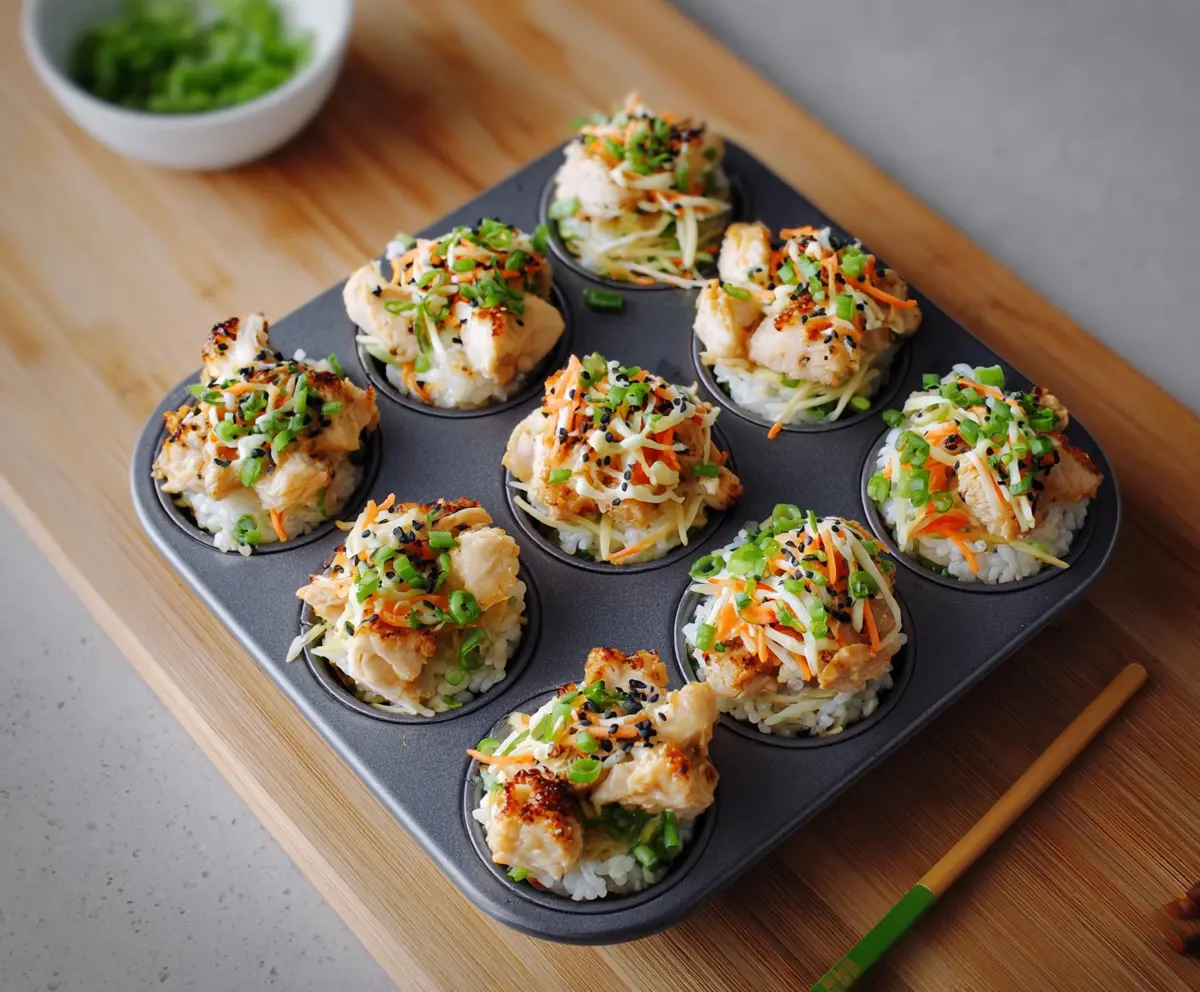
These Chicken Sushi Cups are a fun twist on sushi! Using tender chicken, fresh veggies, and a bit of rice, they’re all served in crunchy cups. Perfect for a light meal or a fun snack.
I love how easy these are to make. It’s like a sushi party in a cup! You can get creative with toppings too. Who knew eating sushi could be this simple and delightful? 🍣❤️
Key Ingredients & Substitutions
Sushi Rice: This sticky rice is crucial for holding the cups together. If you can’t find sushi rice, short-grain white rice can work in a pinch, but it won’t be quite as sticky. For a healthier option, consider brown rice, though it may change the texture a bit.
Chicken: While boneless skinless chicken breasts are great here, you could use cooked shrimp or tofu for a different take. Leftover rotisserie chicken also makes a quick and tasty option.
Rice Vinegar: Essential for sushi rice flavor, rice vinegar adds a nice tang. If you don’t have it, apple cider vinegar is a decent substitute. Just add a touch of sugar to mimic the sweetness.
Shredded Veggies: Carrots and cucumbers add great crunch. You can swap in bell peppers or radishes if you prefer. Fresh spinach or avocado could also work well for a creamier texture!
How Do I Get The Perfect Texture for Sushi Rice?
Cook sushi rice can be tricky! Here’s how to ensure it comes out just right:
- Rinse the rice thoroughly. This removes excess starch for a better final texture.
- Use the right water ratio—2 1/4 cups for 2 cups of rice. If your rice cooker has specific measurements, trust those!
- Let the rice sit covered for 10 minutes after cooking. This allows the steam to finish cooking it.
- Mix the vinegar, salt, and sugar gently without smashing the grains. This keeps the rice fluffy.
Following these tips will help you achieve that ideal sushi rice texture!
Chicken Sushi Cups
Ingredients You’ll Need:
For the Rice:
- 2 cups sushi rice
- 2 1/4 cups water (for cooking rice)
- 1/4 cup rice vinegar
- 1 tbsp sugar
- 1 tsp salt
For the Chicken:
- 2 boneless, skinless chicken breasts
- 1 tbsp soy sauce
- 1 tbsp sesame oil
For the Filling:
- 1/2 cup shredded carrot
- 1/2 cup shredded cucumber (seeds removed)
- 2 green onions, thinly sliced, plus more for garnish
- 1 tbsp black sesame seeds
For Drizzling:
- Optional: wasabi mayo or spicy mayo
How Much Time Will You Need?
This yummy recipe takes about 20 minutes to prepare and about 10 minutes to bake. After that, a little cooling time for the rice is needed, but overall, you’ll be enjoying these tasty Chicken Sushi Cups in about an hour!
Step-by-Step Instructions:
1. Prepare the Sushi Rice:
Start by rinsing the sushi rice under cold water until the water runs clear. This helps get rid of excess starch. Next, combine the rice with 2 1/4 cups of water in a rice cooker or pot. Cook according to your rice cooker instructions, or bring it to a boil on the stove. Then, lower the heat and cover to simmer for about 15 minutes until all the water is absorbed. Let it stand, covered, for another 10 minutes to finish steaming.
2. Season the Rice:
In a small bowl, mix the rice vinegar, sugar, and salt until the sugar is dissolved. Gently fold this mixture into your cooked rice to give it that delicious sushi flavor. Let the rice cool to room temperature while you move on to the next steps.
3. Cook the Chicken:
Cut the chicken breasts into bite-sized cubes. In a bowl, toss the cubes with soy sauce and sesame oil. Heat a skillet over medium heat and cook the chicken until it’s golden and cooked through, which should take about 5-7 minutes. Once done, remove the skillet from the heat and set the chicken aside.
4. Preheat the Oven:
Turn your oven on to 350°F (175°C) and lightly grease a muffin or mini muffin tin to prepare for assembling the sushi cups.
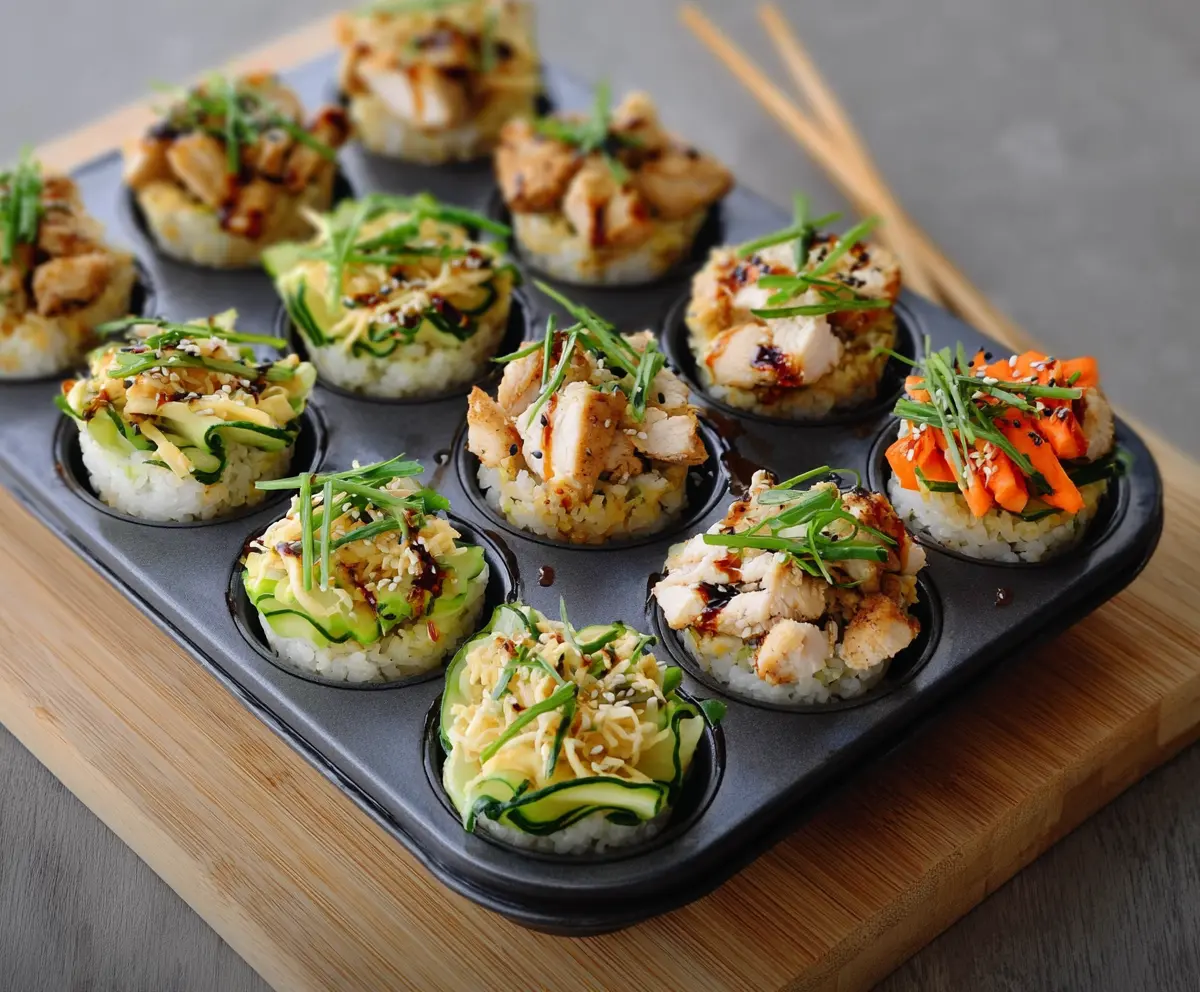
5. Assemble the Sushi Cups:
Using your wet hands or a small spoon, press a layer of sushi rice into each muffin tin cup, creating a nice base. Then, add a small handful of shredded carrot and cucumber on top of the rice in each cup.
6. Top with Chicken:
Now, add 2-3 pieces of the cooked chicken on top of the veggies in each cup. These will be the star of your sushi cups!
7. Add Finishing Touches:
Sprinkle the sliced green onions and black sesame seeds over each sushi cup to add flavor and a touch of crunch.
8. Bake:
Place the muffin tin in the preheated oven and bake for about 8-10 minutes to warm everything through and let the flavors meld together.
9. Drizzle and Serve:
Once they’re out of the oven, you can optionally drizzle a little wasabi mayo or spicy mayo for an extra kick. Carefully lift each sushi cup from the tin and serve warm or at room temperature. Enjoy these delightful Chicken Sushi Cups as a fun, hand-held sushi-inspired appetizer or light meal!
Can I Use Brown Rice Instead of Sushi Rice?
While sushi rice is best for this recipe due to its sticky texture, you can use brown rice as a healthier option. Just keep in mind that the texture may be different, and the cooking time will be longer, so you may need to adjust the water ratio accordingly.
Can I Use Cooked Chicken or Other Proteins?
Absolutely! If you have leftover cooked chicken or rotisserie chicken, that will work perfectly. You can also substitute with tofu, shrimp, or other proteins based on your preference.
How Can I Store Leftovers?
Store any leftover Chicken Sushi Cups in an airtight container in the refrigerator for up to 3 days. To reheat, simply place them in the microwave until warmed through. Be careful not to overheat, as the rice may become dry.
What Can I Use for a Gluten-Free Option?
If you need a gluten-free version, substitute the soy sauce with tamari or a gluten-free soy sauce alternative. Also, ensure that the rice vinegar used is gluten-free, as most are, but it’s always good to check the label.